
KeyShot vs AI Rendering
KeyShot vs AI: The guide for animation prompts.
This article is part of a complete Rhino rendering module for jewelry designers.
Explore the full course section ↓
Take your Rhino renderings to a professional studio level using advanced AI tools to enhance lighting and staging in a virtual photo set. Learn how to transform raw models into breathtaking marketing and advertising assets that close deals and maximize your business potential. Despite Rhino’s power in modeling, the field of animation lags behind. Rhino is very strong as modeling software, and its rendering options improve with every version, yet when trying to export a rendered animation, it forces us to work with manual image sequences instead of ready-to-use video files.
Rhino, at its core, is modeling software and not video editing software. Therefore, the Animation Tab operates on a Frame-by-Frame Rendering method:
It calculates the camera or object movement. It exports each frame as a separate image file (JPG/PNG). It leaves the “stitching” work to you.
The easiest way in this case is to connect image sequences as a GIF on GIF MAKER websites, but this is not easy, convenient, or efficient when the goal is to post on social media that accepts MP4 files, requiring you to both create the file and convert it.
The professional solution is an additional rendering software from the world of classic rendering like KeyShot; the disadvantage in this case is paying for additional software and another learning curve for excellent yet complex software. If you have the time and resources and your business focuses on rendering, then shortcuts are not necessarily the ultimate solution for you. But if your main work is modeling in Rhino and 3D printing jewelry, and all you need are simple, easy, and fast ways to market your products, this is the right place for you.
Can AI replace the KeyShot rendering engine? Animation comparison.
In this post, I dive deep into KeyShot’s list of built-in animations. For each animation type, I created a precise “prompt equivalent” and ran it simultaneously in the leading AI engines.
I have gathered for you a collection of the most impressive and successful results from this process. The combination of CAD logic and AI speed produced surprising results.
I’d love to hear your thoughts: which one looks most successful to you? And if you found additional prompts or variations that worked for you, share them with us in the comments!
This is the list of animation options appearing in the KeyShot Animation Wizard:
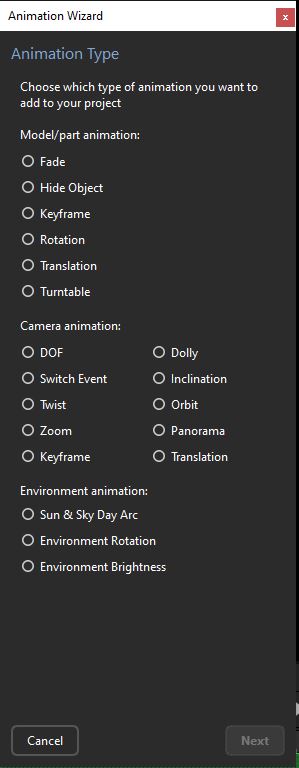
Model/Part Animation
- Fade: Creating an effect of gradual appearance or disappearance of a part by changing its Opacity level.
- Hide Object: Causes an object to disappear instantly at a specific point on the timeline.
- Keyframe: Allows free and precise control over the position, angle, and size of a part by setting key points along the timeline.
- Rotation: Rotating a part around a specific axis (X, Y, or Z) or around a defined Pivot point.
- Translation: Moving a part in a straight line along one of the axes in space.
- Turntable: A continuous 360-degree rotation (or less) of the model, perfect for showcasing the product from every angle.
Camera Animation
- DOF (Depth of Field): A gradual change of focus and blurring of the background or foreground during the animation.
- Switch Event: Allows switching between different pre-defined cameras during the scene rendering.
- Twist: Rotating the camera around its line of sight (creating a side-tilt effect).
- Zoom: Changing the focal length of the lens to zoom in or out of the object without moving the camera itself.
- Keyframe: Creating a complex movement path for the camera by defining different viewpoints in space.
- Dolly: Physically moving the camera forward or backward toward the object (unlike zoom, the perspective changes here).
- Inclination: Changing the vertical angle of the camera (tilting up or down).
- Orbit: Rotating the camera around the center point of the scene or around the model.
- Panorama: Rotating the camera around itself to display the entire environment (similar to a panoramic photo on a mobile phone).
- Translation: Linear movement of the camera (sideways, up, or down) parallel to the scene.
Environment Animation
- Sun & Sky Day Arc: Simulating the movement of the sun throughout the day, changing the direction of shadows and the color of the lighting.
- Environment Rotation: Rotating the entire environment image (HDRI) around the model to change the direction of reflections and light.
- Environment Brightness: A gradual change in the lighting intensity of the environment (brightening or darkening the scene).
I created a series of prompts based on this list, and upon reviewing the results, it is clear that the success rate varies. As a specialist in modeling, I insist on maximum precision; in some of the animations, the result was not perfect, and in cases where the AI created a slight distortion of the model, the result was disqualified for marketing, as the model must absolutely reflect the jewelry in reality. I have attached the list of prompts for your personal use.
From CAD to Prompt: KeyShot Animation List in an AI Version.
Translation:
Ultra-realistic macro jewelry video. The exact uploaded piece is preserved. The camera performs a smooth linear translation from left to right (or vertical movement), maintaining focus while revealing different angles of the object. Soft studio lighting, cinematic shadows, refined reflections.
Panorama:
Cinematic jewelry video. The exact uploaded object remains fixed and unchanged. The camera rotates in place (panoramic motion), revealing the environment reflections across the surface of the jewelry. Subtle lighting shifts, realistic materials, elegant and minimal motion.
Dolly
High-end jewelry video. The exact uploaded object is preserved. The camera performs a slow dolly-in movement toward the jewelry, creating a natural perspective shift and increasing intimacy with the object. Background softly blurs, reflections evolve naturally. Cinematic lighting, macro detail, ultra-realistic.
:Keyframe
Cinematic jewelry animation following a smooth multi-point camera path. The exact uploaded jewelry remains unchanged. The camera moves through a sequence of keyframed positions: starting from a distant hero shot, moving closer to a macro detail, then slightly circling to reveal depth and structure. Fluid motion, luxurious pacing, soft studio lighting, and photorealistic.
Zoom:
Ultra-realistic jewelry video. The exact uploaded piece is preserved. The camera performs a slow optical zoom-in from medium framing to extreme macro detail, revealing textures and materials without changing camera position. Shallow depth of field, soft cinematic lighting, elegant reflections, high-end product video style.
In addition, I created a list of prompts for jewelry marketing that are essentially a “directing language” for jewelry: they don’t define technical animation as in rendering software, but rather accurately describe the desired result, a combination of subtle movement, cinematic lighting, and realistic material behavior, while maintaining (as much as possible) strict fidelity to the original object.
Light Sweep:
The full jewelry piece is revealed as a soft light sweep passes across it, creating elegant reflections and sparkle. The object remains still, centered in frame, dark luxury background, controlled highlights, cinematic polish.
Goal: Visual “Wow” factor
Opening Hero:
The jewelry piece slowly emerges from the darkness. Only partial reflections and highlights reveal its silhouette. Soft cinematic lighting, deep shadows, black background. Ultra slow movement, mysterious luxury mood, shallow depth of field, hyper-realistic.
Goal: Creating curiosity and prestige
Macro Reveal:
Extreme macro shot of the jewelry surface, fine textures, engravings, and gemstones. A slow camera slide reveals intricate details with soft light gliding across the surface. Ultra-shallow depth of field, high-end macro photography style, 8K realism.
Goal: Showcasing craftsmanship
Floating:
The jewelry piece floats gently in mid-air with a slow, minimal rotation. Soft ambient lighting, subtle reflections, minimalistic environment, weightless and calm motion, ultra-realistic materials.
Goal: Conveying a premium and airy feeling
Orbit Camera:
A cinematic orbit shot, the camera slowly circles around the jewelry while it remains still. Smooth parallax, soft directional lighting emphasizing volume and shape, shallow depth of field, elegant movement.
Goal: Understanding the form from every angle
Final Hero Lockup:
The jewelry returns to a perfectly centered hero composition. Minimal motion, only subtle shimmering reflections. Clean background, logo-ready framing, luxurious stillness, ultra-sharp focus, 8K.
Goal: End shot / Brand frame
The big difference between the world of classic rendering like KeyShot and AI video.
When we approach creating video for our products, it is important to understand that there is a profound difference between the world of classic rendering, represented by KeyShot, and the world of AI video. The most fundamental difference lies in the level of control: in KeyShot, we control the animation directly, we define a precise rotation axis, set the speed, move the camera along the timeline, and receive a result that is a perfect technical execution of the commands we gave. In contrast, when working with AI prompts, we do not control the movement but rather describe the desired result. Terms like “slow, elegant rotation” or “soft cinematic lighting” are artistic intentions, not physical definitions.
This difference becomes even more significant when examining the various types of animation. While in KeyShot, motion is defined by numbers and the Curve Editor, in AI, the model simply “guesses” the movement based on our description. The same applies to the camera and lighting: in KeyShot, everything is physical and precise,
from the camera path to the lighting intensities in the HDRI. In AI, we request a “cinematic feel” and receive a visual interpretation of the set, rather than an actual construction of it. But the truly critical point is the geometry; in KeyShot, your model is “sacred” and will never change, whereas in AI, there is a risk that the model will “invent” shapes, round off corners, or distort proportions. Even prompts that emphasize maintaining the original geometry do not constitute an absolute insurance policy.
In the end, the difference comes down to one word: control versus interpretation. In KeyShot, you operate the object, and in AI, you ask the world to appear in a certain way. Therefore, the prompts I am sharing here are built completely differently from the technical settings we are familiar with. They integrate three critical layers: artistic intent (such as luxury or emotional), model constraints to prevent distortions, and a cinematic editing mindset.
Using an analogy from the world of cinema, working in KeyShot is like directing with a remote control where every frame is 100% controlled, while writing AI prompts is like describing a dream or a fantasy to another person and hoping they will draw it exactly as you imagined. This is a significant transition from the role of the “technician” to the role of the “director,” where language and description become our primary working tools.
How do you choose the right tool for the task?
The bottom line is that the choice between the scientific precision and absolute control of KeyShot versus the visual “magic” of AI depends on your project’s ultimate goal. Beyond the visual outcome, there is a significant operational consideration: working with AI allows you to complete the modeling phase in Rhino and skip directly to creating a breathtaking marketing video, without passing through the traditional rendering station. This is for designers seeking efficiency and speed without compromising on style.
Go with KeyShot when there is no room for compromise. If you are working on an official catalog or an e-commerce site where the jewelry must look exactly as it does in reality, KeyShot is your partner. It guarantees perfect precision, technical realism, and zero errors at the modeling level.
Go with AI when you want to sell a feeling (Vibe). If the goal is to generate quick concepts, a dreamy atmosphere, or elements that are very difficult to produce in traditional 3D software, such as floating, organic shape-shifting (Morph), or complex scenes within seconds, artificial intelligence will provide the creative solution.
Pro Tip: The Ultimate Hybrid.
The real power today lies in the connection between these worlds. Instead of choosing a side, try the following strategy:
Create a perfect and precise still render; it doesn’t matter if you create it in KeyShot or Rhino. Feed that image into the AI engine. Use focused prompts (like the ones I detailed earlier).
The result? You enjoy the best of both worlds: the rigid 3D precision that protects your brand, combined with the style and hypnotic visuals of AI. This is the combination that creates an unforgettable marketing impact.
Learn Professional Rhino Rendering for Jewelry Design
This article is part of a complete Rhino rendering module included in my online jewelry CAD course.
The rendering section covers:
- materials and gemstones
- HDRI lighting workflows
- studio visualization
- hyper-realistic materials
- jewelry display lighting
- AI-assisted rendering workflows
- marketing visuals and animation


No Comments
Sorry, the comment form is closed at this time.